Craft Supplies - Craft Supplies Online - Buy Craft Supplies
Quality Craft Supplies Ranging From the Usual to the Not So Usual, Delivered To Your Door
Excellent Customer Service - Fast Shipping - Online since 1994!

In business since 1985. Online since 1994. We sincerely thank you for supporting family owned small businesses!

Give us a call from 8am to 6pm Mon-Fri. We are available to answer questions or to take your order.
(361) 645-3325

 Beaded Bud Vases

Beaded Bud Vase Instructions
 
Make these small beaded bud vases for yourself, share with others, as gifts or as fund raiser and bazaar projects. Make using your favorite bead colors!

If you make this project please share your photos with us. If we use them on our website or on Facebook you will get 15% off of your next order over $25!

~ ~ ~ ~
Materials Needed:

Instructions:

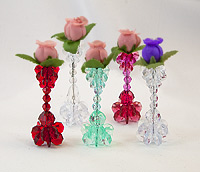
Separate 1 rosebud from the bunch and straighten it's stem. Holding the rosebud upside down, begin by threading the 2 - 18mm Starflake beads onto the stem.

Next, add 2 - 12mm Starflake beads. Be sure that the Starflake beads nest themselves together on the stem then add the 3 - 6mm Faceted beads onto the stem.

Add the 12mm Faceted bead onto the stem and then add the 2 - 25mm Starflake beads onto the stem.

Using jewelry pliers pull the stem somewhat tight through the beads and then fold the stem to the outside of the vase, upward toward the rosebud and wiggle it up against the inside of the 2 - 25mm Starflakes. Once you have pushed it inside as far as you can, trim the stem and push the end toward the middle to conceal it.

(Optional) If your vase does not seem as sturdy as it should or seems to sway a little cut a 2" piece of 20 gauge wire and straighten it. Carefully push the wire up from the bottom of the vase, toward the rosebud, into the center of the beads, where the floral stem is. Push it in as far as you can and trim any excess.

Straighten your vase and then using any type of CLEAR drying household glue put a drop of glue into the center hole at the bottom of the vase and let dry.

Aren't they beautiful!

Please Read: Won't you please consider supporting this free pattern by clicking on one of the ads shown on this page. Any revenue generated helps pay for the costs of providing you with more patterns! Its a win, win situation for us all! We sincerely thank you!


Return to Craft Instruction Menu


Pin It On Pinterest


Click to verify BBB accreditation and to see a BBB report.


© Copyright, 1994-2024, BJ's Craft Supplies, All rights reserved.   661 Abrameit Rd, Goliad, TX  77963.
Click our phone number to call us at (361) 645-3325