Helpful Hint: Bead projects are a lot easier to do than they look. The basic idea is slipping beads onto cords and criss-crossing cords through beads. Terms like "ladder","add on" row and "joining in a circle" are just used to describe the different steps.
Terms:
- A "Ladder"
- A Ladder is the row that is made to start off. It is made by slipping a (side) bead, (center) bead and a (side) bead onto a cord and criss-crossing cords through a (center) bead. See Fig 1
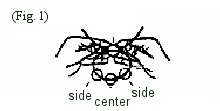 Figure 1
- Slide the beads to the center of the cord. Then, build the "ladder" to whatever length necessary by adding a (side) bead to each cord and criss-crossing through a (center) bead. See Fig 2
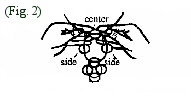 Figure 2
- Joining a "ladder" in a circle:
- This is done by slipping a (side) bead onto one cord and then slipping that same cord through the first (center) bead at the other end of the "ladder" that started it off. Then, criss-crossing cords through a new (side) bead. See fig 3.
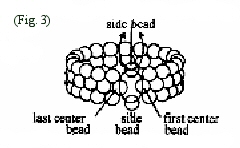 Figure 3
- An "add on" row is adding a row onto the last one. To do this, slip a (center) bead and a (side) bead onto the outer cord (which if you like to work toward the right the left cord is the outer cord or if you work to the left the right cord is the outer) and criss-cross through a (center) bead.
- After you have criss-crossed through a (center) bead the cords will be coming out of the top and bottom of the (center) bead as in fig 4. When the cords are coming out of the top or bottom the bottom cord is always the inner cord and the top cord is always the outer cord.
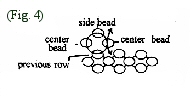 Figure 4
- Then, slip the inner cord through the next (side) bead of the previous row. See Fig 5.
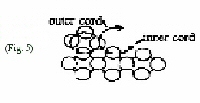 Figure 5
- Slip a (side) bead onto the outer cord and criss-cross through a (center) bead.
- Continue this step all the way around the row. To do an "add on" row, the very first step is to slip on two beads and criss-cross through a third bead. After that, the rest of the row is slipping on one bead and criss-crossing through a second bead.
- Joining an "add on" row in a circle:
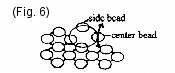 Figure 6
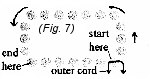 Figure 7
- When you have slipped the inner cord through the last (side) bead of the previous row, slip that same cord through the first (center) bead that started this row. Then, criss-cross cords through a (side) bead.
* Always be sure to keep the cords pulled very tight. Pull cords very tightly each time you criss-cross cords through a (center) bead. It will not work to wait
until the end of the row and then pull tightly, you must pull tight after each step. If the row you are working on is coming out rippled looking instead of flat, then the cords are not pulled tight enough.
After completing each row stop and look at the row. If it looks odd or out of shape it is probably not correct. You may have added an extra bead or forgot to slip the inner cord through the next (side) bead and it is easier to pull apart after each row than getting too far and then realizing you've made a mistake.
- It is not recommended that you read the pattern first and then go back. The directions may be very difficult to understand by just reading and not doing. Instead, follow each step doing just what it says and you will find that it is not as difficult as it may seem. Refer back to the Terms for help.
Use all 10mm beads unless otherwise stated.You will be beginning at the bottom of the clock and working up from there.
1. Cut a 76" piece of cord. Build a "ladder" that is thirty-six (center) beads long.
2. Join this ladder in a circle and tie and trim off. Form this circle into a rectangle that is seven (side) beads wide and eleven(side) beads long.
3. Cut another 76" piece of cord. This next row will be going flat.
(a) Slip through two corner beads on any one of the four corners of your rectangle. Slip a (side) bead onto the outer cord and criss-cross throug a (*center) bead.
(b) Slip the inner cord through the next (side) bead of the previous row. Slip a (side) bead onto the outer cord and criss-cross through a (center) bead. Continue this along the row until you get to the last bead of this row.
(c) Slip the inner cord through the next two corner beads and criss-cross through a (center) bead.
(d) Continue along the row repeating step (b) along the sides and when you reach a corner follow step
(c).
To end the row: after you have slipped the inner cord through the last bead of the previous row, slip a (side) bead onto the other cord. Slip that same cord through the next(center) bead that is already there and tie and trim off excess.
4. Cut a 2-yard piece of cord. This next row will be going up from the last flat one. Slip through one of the (side) beads of the previous row. Do a regular "add on" row along the straight edges, but when you reach the corners they will be done a little differently than the last row. When you have slipped through the last bead of one side, slip a (side) bead onto the outer cord and criss-cross through a (center) bead. Then slip through the next (side) bead of the next side. This is different because in the previous row on the corners you would slip through two corner beads at once. On this row you will slip through one bead at a time all the way around the row and do a regular add on row. Do not add or omit any beads at the corners. End the row as before. Tie and trim off excess cord.
5. Slip a 60" piece of cord through two corner beads and do another flat add on row as in step 3. Tie and trim off excess cord.
6. Slip a 54" piece of cord through one of the side beads of the previous row. Do another add on row going up from the previous flat row as in step 4. Tie and trim off excess cord.
7. This next row will continue to go up, but will start the opening for the pendulum. Slip a 68" piece of cord through the bead shown in (fig 7). Do another add on row working toward the right (down the side, across the back and up the other side). The row will end where shown in (fig 7), slip the cord through the bead shown. Then, slip a (center) bead onto that same cord and criss-cross through a (side) bead. This will have put the cords in position for an add on row. Do not tie or trim off cords.
8. Do an add on row working towards the left along the previous row made in step 7. Tie and trim off excess cord.
9. Slip a 68" piece of cord through the (side) bead that ended the previous row. Do two more add on rows along the previous. Tie and trim off excess.
10. Slip a 68" piece of cord through the (side) bead that ended the previous row. Do two more add on rows. Tie and trim off excess.
11. Slip a 68" piece of cord through the (side) bead that ended the previous row. Do two more add on rows. Tie and trim off excess.
12. Turn the clock so one of the sides are facing you (the top row on the side is three (side) beads long). Slip a 24" piece of cord through the first (side) bead on the left of this top row.
(a) Slip a (center) bead and (side) bead onto the outer cord and criss-cross through a (center) bead.
(b) Slip the inner cord through the next (side) bead. Slip a (side) bead onto the outer cord and criss-cross through a (center) bead.
(c) Slip the inner cord through the next (side) bead. Then, slip a (center) bead onto that same cord and criss-cross through a (side) bead. DO NOT tie or trim off.
Use all 10mm beads unless otherwise stated.You will be beginning at the bottom of the clock and working up from there.
13. Do an "add on" row back along the previous row. Tie and trim off excess. The rosw will go flat from the previous rows. These are added to make the top part of the clock wider than the part wiere the pendulum hangs.
14. Slip a 24" piece of cord through the left bead on the other side of the clock and repeat steps 12 & 13.
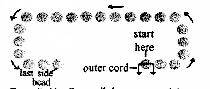
15. Slip a 66" piece of cord through the bead shown in Fig. 8. Do an "add on" row all the way around the top row. When you have gone around and slipped the inner cord through the last (side) bead, slip a (side" bead onto the outer cord and criss-cross through a (center) bead. Now you will be adding beads to make a "ladder" to connect to the beginning of this row. To do this:
(a) slip a (side) bead onto each cord and criss-cross through a (center) bead
(b) Repeat step (a) three times.
(c) Slip a (side) bead onto each cord and criss-cross cords through the first (center) bead that started this "add on" row. Tie and trim off.
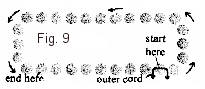
16. Turn the clock around so that the opening in the front is facing away from you and slip a 50" piece of cord through the bead shown in Fig. 9. Do an "add on" row going toward the right around the previous row stopping where shown in Fig 9. Tie and trim off excess cord. This row and the rest of the rows are done this way so the back can remain open in order to place the clock movement inside and also to be able to change the clock battery.
17. Slip a 50" piece of cord through the (side) bead that ended the previous row. Do another "add on" row along the previous one. Tie and trim off excess cord.
18. Repeat step 17.
19. Turn the clock around so that the bottom opening (the pendulum opening) is facing you. This is the front of the clock. The next two rows will be done so that there is an opening left in the front. This is so the shaft of the clock face will fit through. Looking at the top row across the front, this row consists of eleven (side) beads. Count over from the left four (side) beads and slip a 46" piece of cord through that fourth (side) bead. Going towards the left, do an "add on" row around the previous row to where it ends. When you have slipped the inner cord through the last (side) bead, slip a (center) bead onto that same cord. Criss-cross cords through a (side) bead. The cords are now in position for an "add on" row. Do an "add on" back along the row you just made. Tie and trim off.
Look back at the row that you just counted over four beads from the left. This time count over four beads from the right and slip a 46" piece of cord through that fourth bead. Go towards the right and do the exact same thing as the previous step.
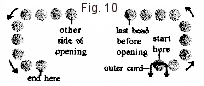
Turn the clock around to back again. Slip a 50" piece of cord through the bead shown in Fig 10. Do an "add on" row working toward the right along the previous row. When you slip the inner cord through the last (side) bead before the opening, slip a (side) bead onto the outer cord and criss-cross through a (*center) bead. Now you will be adding beads again to make a "ladder" to connect the open part. Slip a (side) bead onto each cord and criss-cross through a (center) bead. Repeat this two more times. Then, slip the inner cord through the next (side) bead on the other side of the opening and continue the "add on" along the row. Tie and trim off excess cord.
22. Slip a 50" piece of cord through the bead that ended the previous row. Do another "add on" row. Tie and trim off excess.
23. Repeat step 22.
24. Turn the clock so that it is facing you (the side with the opening for the pendulum and the small opening in the top is the front). Looking at the top row only across the front it should consist of eleven (side) beads. Count over three from the left and slip a 24" piece of cord through the third bead. Do an "add on" going to the right stopping at the third bead from the right (after you have slipped through that bead not before). Tie and trim off excess.
25. Slip an 18" piece of cord through the second bead from the left of the previous row. Do an "add on" row going to the right stopping at the second bead from the right. Tie and trim off.
26. To close off the top: Slip a 64" piece of cord through the two front left corner beads in the top of the clock (remember the front is the side with the small opening in the top and the opening for the pendulum in the bottom (see fig. 11). You will be starting here and working your way along the front row that is show by darkened beads. This row will be going flat from the previous row.
(a)Slip a (side) bead onto the outer cord and criss-cross through a (center) bead.
(b) Slip the inner cord through the next (side) bead. Slip a (side) bead onto the outer cord and criss-cross through a (center) bead.
(c) Continue along the row.
(d) When you have slipped the inner cord through the last dardened bead, then slip through the next (center) bead that is already there on that corner. Criss-cross through a (side) bead.
(e) Slip the outer cord through the next (center) bead that is already there to begin another row across the previous one. When this row is completed tie and trim off excess.
27. There will now be one row left open in the top of the clock. Slip a 36" piece of cord through the three corner beads in the left corner.
(a)Criss-cross cords through a (center) bead.
(b) Slip the inner cord through the next (side) bead and slip the outer cord through the next (side) bead. Criss-cross through a (center) bead.
(c) Slip the inner cord through the next (side) bead (this is a bead with the hole going vertically). Slip a (side) bead onto the other cord and criss-cross through a (center) bead. Continue along the row closing off the top of the clock. Tie and trim off excess cord.
28. Looking at the front of the clock slip a 36" piece of cord through the bead shown in Fig 12. Do another "add on" row along the beads shown. Tie and trim off.
29. Turn the clock so that you are looking at one of the sides. Slip a 15" piece of cord through the bead at the end of the row just made. Do an "add on" row along those four beads on the side. This will make the side hang over like the front. Tie and trim off.
30. Repeat step 29 on the other side.
31. Cut a 28" piece of cord and build a "ladder" that is nine (center) beads long. Tie and trim off excess. Make two of these and set aside for now.
32. Cut a 20" piece of cord and slip on forty-one 8mm faceted beads. Tie the ends together in a knot to form a circle. If your clock face has a protective plastic covering peel it off now. Glue circle of 8mm beads onto the edge of the clock face. Center the face onto the front of the clock making sure the hole in the clock face is at the opening in the front of the clock. Glue in place.
33. Glue the two "ladders" made in step 31 one on each side of the clock face.
34. To make the pendulum bob: Attach one end of the wire stem to the clock movement by slipping the wire through the opening in the pendulum movement and twisting the wire together to tightly hold int in place. Slip nine 8mm faceted beads onto the other end of the wire. Cut the wire leaving a 1" tail of wire after the beads. Glue the wire to the back of the mirror.
35. Push the two prongs on the metal bracket into the slot on the top of the clock movement from the back (the side with the pendulum). Slip the clock movement into the back of the clock. Slip the shaft through the hole in the clock face so that it come out the front. Slip the washer on and screw the large nut on tightly to hold it in place.
36. Place the hour hand on facing twelve o'clock first. Then, place the minute hand on also facing twelve. Screw the small nut onto the end of the shaft and tighten gently. Then, push the second hand into the center hole. Insert a battery and set clock.