In business since 1985. Online since 1994. We sincerely thank you for supporting family owned, family operated businesses!
Give us a call from 8am to 6pm Mon-Fri. We are available to answer questions or to take your order.
(361) 645-3325
If you make this project please share your photos with us. With your permission we'll add it to the page and credit it to you.
Rulers haven't always been marked with the standardized measurements we take for granted today. Early measurements were often based on parts of the human body, giving us units such as the foot, hand and cubit. As standardized systems developed, rulers made it possible to reproduce measurements much more reliably. Flexible tape measures came later, making it practical to measure fabric, bodies, curves and other things a rigid ruler couldn't easily handle. For crafters, having both within reach covers an amazing number of projects.
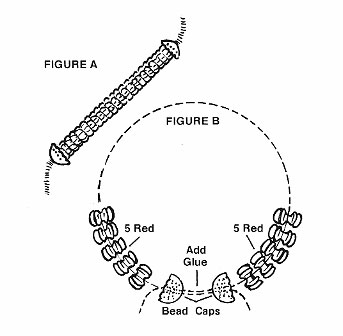
1. Slide 5 red, 34 green and 5 red starflake beads onto the chenille stem. Center the beads so that both chenille stem ends are of equal length.
2. Slide one bead cap (cup side in) onto each chenille stem end and up to the beads (Figure A). Thread the right stem end through the center hole of the left bead cap and the left stem end through the center hole of the right bead cap (Figure B). Place a drop of bond cement between the bead caps and pull the ends of the chenille stem tight.
3. Slide five red starflake beads onto each stem end. Add cement to last bead and chenille stem to hold. Let dry and trim stem ends close to end beads.