Craft Supplies - Craft Supplies Online - Buy Craft Supplies
Quality Craft Supplies Ranging From the Usual to the Not So Usual, Delivered To Your Door
Excellent Customer Service - Fast Shipping - Online since 1994!

In business since 1985. Online since 1994. We sincerely thank you for supporting family owned, family operated businesses!

Give us a call from 8am to 6pm Mon-Fri. We are available to answer questions or to take your order.
(361) 645-3325

Yo-Yo Angels - Free Craft Project Instructions

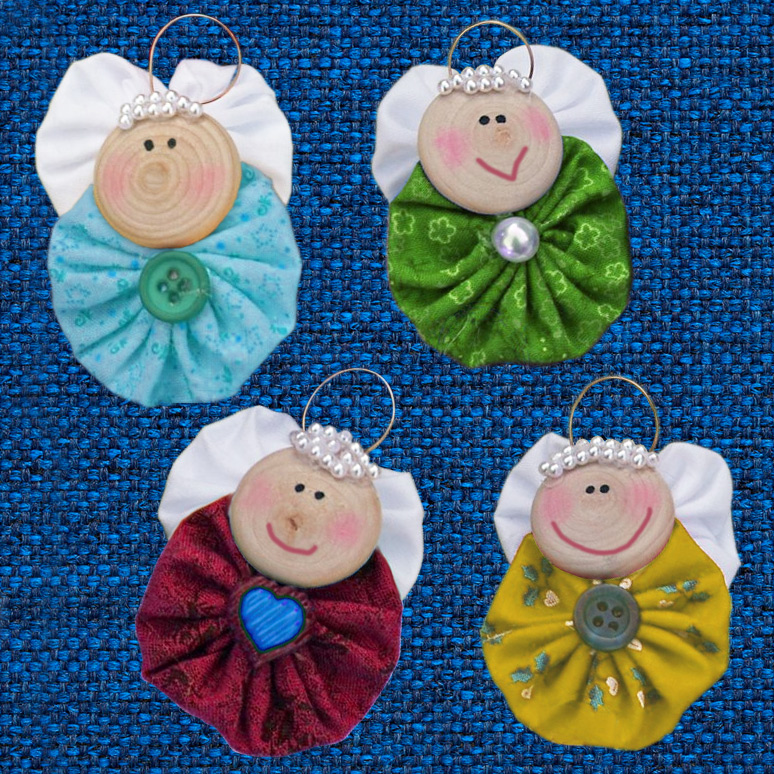
These adorable yo-yo angels are the perfect gift for Mom, Grandma, your best friend, or anyone you feel would appreciate their comfort.

If you make this project please share your photos with us. With your permission we'll add it to the page and credit it to you.

Contributed by Eileen Herron, Amanda Formaro, with permission
Bonus Information You Didn't Ask For
Did You Know?

Googly eyes are also known as wiggle eyes, and not all of them have to be glued in place. While the familiar flat-backed versions can be glued onto a project, some wiggle eyes have a shank on the back, much like a button, so they can be sewn onto fabric and other materials.

Gather Your Supplies

Note: To help you locate the material required for this project, some of the materials listed may be linked to this or other websites and may contain affiliate links.

How To Make It

For the wings, run a stitch from the top of the yo-yo down to the hole in the yo-yo and pull down. Tie off. This will look similar to a heart. The finished yo-yos should measure about 1 3/4 inches in diameter. Lay the wings on your work surface, hole side up. Position yo-yos so that the bumps of the wings show above the dress (see photo). Hot glue the dress on top of the wings, hole side facing up. Glue a button and/or ribbon bow to the center of the yo-yo dress.

Use tacky glue to adhere several beads or sequins to the top of the button or furniture plug to create the hair. The easiest way to do this is to put the glue on then dip the plug into the beads. With your fine tip marker or a stylus or toothpick and black paint, dot on two eyes. Use damp Q-Tip and blusher to create cheeks. Glue the face toward the top of the dress, so that the top of the button or furniture plug is flush with the top of the dress (use photo as a guide).

Wrap a piece of gold wire around a fat marker (Sharpie is a great size), trim ends. Dab some tacky glue in between the wings and the dress and slide the halo in. Allow to dry completely.

https://www.bjcraftsupplies.com - Every Pattern Deserves a Few Beads at the End
 
 
A Little Help Keeps the Patterns Coming!
The advertising on our pattern pages helps pay for maintaining our collection and adding more free patterns. If you spot an ad that interests you, please click a look! Your help supports the collection and keeps more free patterns coming. More patterns for you, a little help for us. We think that's a pretty good trade!


Still in the Mood to Make Something?
Browse even more free craft ideas and patterns at
You never know what might catch your eye!


Pin It On Pinterest


Click to verify BBB accreditation and to see a BBB report.


© Copyright, 1994-2026, BJ's Craft Supplies, sister site to Craft Supply Depot, All rights reserved, BJ's Craft Supplies.   661 Abrameit Rd, Goliad, TX  77963.
Click our phone number to call us at (361) 645-3325          p0008