Craft Supplies - Craft Supplies Online - Buy Craft Supplies
Quality Craft Supplies Ranging From the Usual to the Not So Usual, Delivered To Your Door
Excellent Customer Service - Fast Shipping - Online since 1994!

In business since 1985. Online since 1994. We sincerely thank you for supporting family owned, family operated businesses!

Give us a call from 8am to 6pm Mon-Fri. We are available to answer questions or to take your order.
(361) 645-3325

Beaded Star Christmas Ornament Instructions - Star Within A Star Beaded Christmas Ornament - Free Christmas Craft Instructions

Adorn your tree with these beautiful beaded Christmas stars. Actually a star within a star this beaded ornament makes a great decoration, package decoration or even a great gift.

If you make this project please share your photos with us. With your permission we'll add it to the page and credit it to you.

Contributed by From Our Files
Bonus Information You Didn't Ask For
Did You Know?

Hot glue guns were originally developed for industrial use, not crafting. Hot-melt adhesives offered manufacturers a fast way to bond materials without waiting for a liquid glue to dry. Smaller, easier-to-use glue guns eventually brought the same idea into homes and craft rooms. Hot glue works a little differently from many familiar adhesives: the glue stick is melted inside the gun, applied while hot, and forms its bond as it cools and hardens—one reason it became such a useful tool for projects that need to stay put without a long drying time.

Gather Your Supplies

Note: To help you locate the material required for this project, some of the materials listed may be linked to this or other websites and may contain affiliate links.

How To Make It

Carefully cut 3 of your Tinsel Stems in 6" lengths. Refer to Fig 2. Thread 16 - 6mm Faceted AB beads onto each of two 6" pieces of Tinsel stem. Allow room enough so that there is a small space in the center of the stem as shown for joining later. Put a drop of glue on the ends and slip an 8mm Faceted bead over each end of both pieces. Set aside to dry. Make 2 more units exactly like this and set aside to dry.
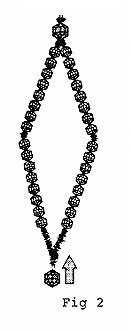
Beaded Star In a Star Pattern Figure 2 - Free Craft Pattern

Carefully cut 2 of the 12" Tinsel Stems into 6" pieces again. You will use only 3 of these pieces at this time. Refer to Fig 3. Pick up one of the 6" pieces and twist tightly around the Sunburst bead as shown. Twist twice. Do this again with two more of the 6" pieces, wrapping around another section of the bead.
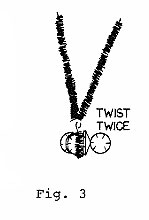
Beaded Star In a Star Pattern Figure 3 - Free Craft Pattern

Refer to Fig 4 and begin to thread the beads as shown, putting on first *6mm Faceted AB Bead, AB Spaghetti Bead, drop of glue, 6mm Faceted AB Bead. Repeat from * on each of the other 5 points. Set aside to dry.
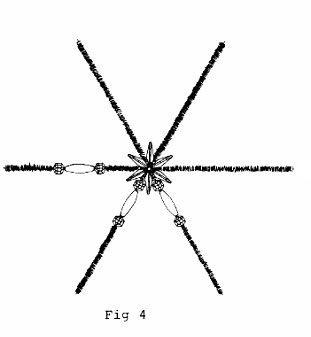
Beaded Star In a Star Pattern Figure 4 - Free Craft Pattern

Now you are ready to assemble your Star Ornament. Pick up the 3 units you made in Step 1 and assemble them as shown in Fig 5, slipping one unit into the first one, and while holding it in place slip the third unit inside the other two.
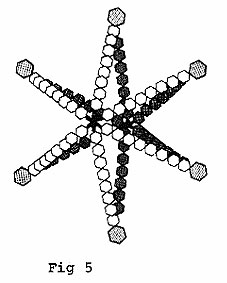
Beaded Star In a Star Pattern Figure 5 - Free Craft Pattern

Pick up the remaining 6" piece of Tinsel stem and cut this into two pieces to use as a wrap to hold the 3 units together, as tightly as possible. You will mash the 3 centers together before wrapping the tinsel stem piece around the centers.

Look at Fig 6, put a drop of glue at the spot where your AB Sunburst will be, immediately adjacent to the outer Star on the final tinsel Stem, leaving this one the full 12" length. Wrap it around the center of one side, another drop of glue, thread another AB Sunburst bead, slip the center star into place in the middle. Work this long Tinsel Stem through the sunburst bead in the middle of the inner star. Another drop of glue, put on your final sunburst bead.
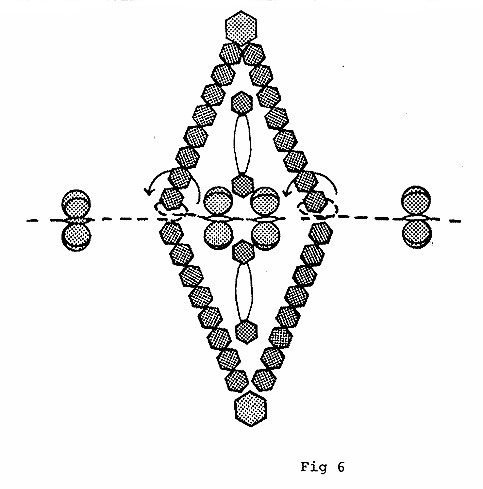
Beaded Star In a Star Pattern Figure 6 - Free Craft Pattern

Allow your ornament to dry overnight, then clip off the excess Tinsel Stems.

This ornament is also very attractive when made up with 8mm AB Faceted Beads used every place you have used a 6mm Faceted Bead. Try this in any number of color combinations. Mix and match transparent beads with iridescent beads.

https://www.bjcraftsupplies.com - Every Pattern Deserves a Few Beads at the End
 
 
A Little Help Keeps the Patterns Coming!
The advertising on our pattern pages helps pay for maintaining our collection and adding more free patterns. If you spot an ad that interests you, please click a look! Your help supports the collection and keeps more free patterns coming. More patterns for you, a little help for us. We think that's a pretty good trade!


Still in the Mood to Make Something?
Browse even more free craft ideas and patterns at
You never know what might catch your eye!


Pin It On Pinterest


Click to verify BBB accreditation and to see a BBB report.


© Copyright, 1994-2026, BJ's Craft Supplies, sister site to Craft Supply Depot, All rights reserved, BJ's Craft Supplies.   661 Abrameit Rd, Goliad, TX  77963.
Click our phone number to call us at (361) 645-3325          p0051